User Cards - Detailed review
Once you open the user cards menu you will see the below screen.
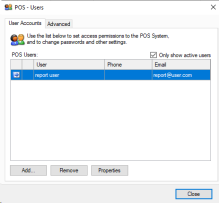
In here simply select a user to edit, or to add a new user. If you are editing a user skip down past the next section as the first screen is only for when a new user is made.
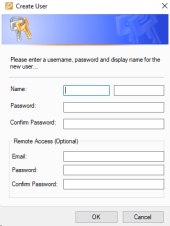
In here you will want to put in the suitable details for your new user, a break down of each field is in the below drop down section.
Name: Displayed name of user. Eg. Packer or Joshua.
Password: Password used to login, if this user will be using touch we recommend a four to six digit numerical only password.
Remote access: This is for report server access off site, such as when working from another location or a home office.
Email: Email address used to login.
Password: Password used for report server login, this is unique from the above password that is used for PBSA POS login.
Once a new user is created you will see the below screen.
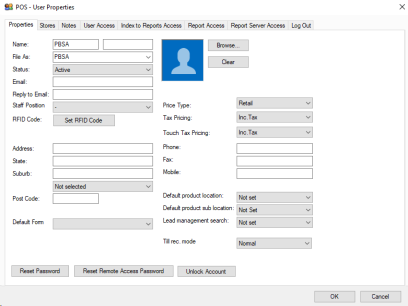
Each of the tabs along the top will be explained in order below, but we will start with this first landing page Properties. The key items to set up here are RFID Code if you are using RFID wristbands, and any defaults this user has that are different to the global defaults along the right hand side.
Name: Users name, displayed in PBSA POS on login.
File As: Search by value when locating orders and sales they may have taken.
Status: If the user is active or inactive.
Email: Email used for report server access and emailing from PBSA POS.
Reply to Email: For emails to customers, such as invoices, where you want them to reply to a different address then the sender.
Staff position: These are set up in settings, and is used to self identify roles to make distinction of users easier.
RFID Code: Pressing this button will either set up the code, allowing you to scan a wrist band to link it to this user, or will wipe the existing code linked to this user.
Address details (Address, State, Suburb, Post Code, Phone, Fax, Mobile): These are all recorded only for your reference and not displayed to customers at any stage.
Default form: When using certain modules this will allow you to define what form this user should be opening by default.
Price Type: Price this user will see by default, during sales or orders the customer selected will over ride this with their price type.
Tax Pricing: Determines if by default they see prices inc tax.
Touch Tax Pricing: : Determines if by default they see prices inc tax in touch modules.
Default Product location/sub-location: This determines where the user draws stock from instead of the global default location.
Lead Management Search: When multiple search options are available you are able to define what one by default this user should use.
Till Rec. mode: Allows you to change the user to a Blind mode, which prevents them from seeing the expected totals during a till reconciliation and instead has them just enter their values.
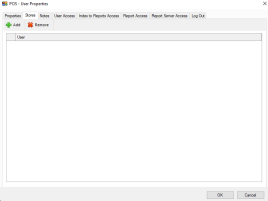
Our next tab Stores only applies when interstore is active, and simply allows you to add or remove a user from additional sites as shown below.
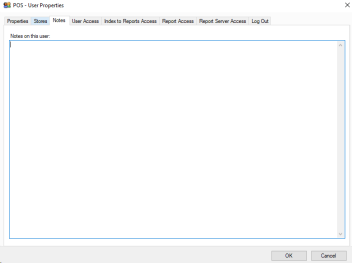
The Notes section is just a notepad section that only users with access to user cards can see.
User access is the most complex part of user cards, and contains every control (except reporting) used for user access to PBSA POS. We highly recommend reading through the drop down menu below the image that covers what every tick box does.
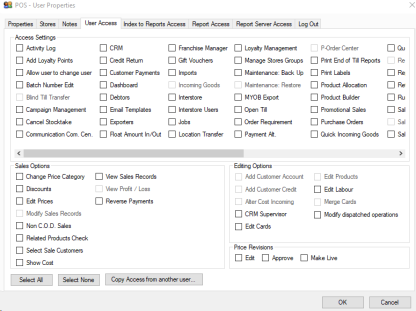
Access Settings
Activity log: Allows the ability to review the activity and audit logs.
Add Loyalty Points: Allows manual addition of loyalty points to customers.
Allow user to change user: Allows swapping from this user to another without logging out.
Batch number edit: Grants permission to edit the batch number for an existing batch.
Blind till transfer: Allows transfer of tills without visibility into expected totals
Campaign Management: Grants access to set up and full control of campaigns, and the sending of them.
Cancel Stocktake: Allows user to cancel an active stock take in progress.
Communication Com. Cen.: Gives access to the communication command centre, which includes a full history of sent emails and sms from the system.
CRM: Gives access to lead management tools.
Credit Return: Allows user to process credit returns.
Customer Payments: Allows user to process customer payments in back office mode.
Dashboard: This is a legacy function and no longer used.
Debtors: Grants user access to view debtors, send statements, and aging statements.
Email Templates: Allows user to create and customise templates for email sending.
Exporters: Gives full access to use Product, Customer, and Supplier exporters.
Float Amount In/Out: Allows user ability to add or remove from the float of a till.
Franchise Manager: Only used for when Franchise related modules are in use, grants some specific region controls.
Gift Vouchers: Allows the sale of and use of gift vouchers.
Imports: Allows user ability to import Products, Customers, and Suppliers.
Incoming Goods: Grants access to perform incoming goods.
Interstore: Allows user access to interstore functionality as suitable.
Interstore Users: Grants user access to user cards originating from other stores.
Jobs: Grants access to Jobs module (If module is available).
Location Transfer: Allows user to move stock between locations.
Loyalty Management: Grants full access to loyalty points functionality features and settings.
Manage Stores Groups: Used for interstore management access.
Maintenance: Back up: Allows user to create database backups.
Maintenance: Restore: Allows user to restore databases to live environment, requires backup access be enabled as well.
MYOB Export: Gives user ability to run accounting exports.
Open Till: Allows user to open the till outside of completing a sale.
Order Requirement: Gives user full access to Order Requirement functionality.
Payment Alt: Grants ability to use Payment Alteration functionality.
P-Order Center: Gives access to Purchase Command Centre to review both active and historic Incoming Goods, Purchase Orders, Stock Transfers, and Order Requirements.
Print end of till reports: Allows user to print the end of till report when reconciling.
Print labels: Grants access to print labels in back office mode.
Product Allocation: Grants user control over product allocation via allocation functionality in Sales Command, Orders, Sales, and Touch mode if enabled.
Product Builder: Gives access to product builder and related templates
Promotional sales: Allows user to create and manage all promotion types.
Purchase Orders: Allows user to place and manage Purchase Orders.
Quick Incoming goods: Gives the ability to process a quick incoming goods when there isn't enough stock available for a sale in process.
Quotes: Grants access to create, manage, and finalise Quotes.
Re-Price: Grants the ability to reprice products.
Report Server: Required for reporting access.
Returns / Refunds: Allows for refunds / returns both in back office and touch modes.
Run Management: Gives access to runs. (If module is available)
Sales / Invoice: Allows user to create and complete sales, along with converting orders into sales / invoices.
Sales Command Centre: Allows user to access and use all tools within sales command centre.
Sales Orders: Gives access to orders and order management, also allows conversion of quotes into orders.
Schedule upgrades: Allows user to schedule when a software upgrade will happen.
Search Items: Allows for searching of products.
Stock Adjustments Save: Allows saving of stock adjustments but not commitment of them.
Stock Adjustments Commit: Allows committing of new and saved stock adjustments.
Stock Take: Gives ability to run, stop, and complete stock takes.
Stock transfers: Allows user to create and submit stock transfers when using interstore module.
Settings: Gives user full access to all local and global settings.
Settlement: Allows user to settle tills.
Subscriptions: When using the subscription module this gives the user access to that module.
Subscription Admin: Grants full privileges when using the subscription module.
Subscription Process: Only allows user to process active and due subscriptions into orders.
Suppliers: Gives user ability to create and manage supplier cards.
Supplier Returns: Allows user to create, submit, and manage supplier returns.
Till Management: Gives full management control over tills and related functions
Till Reconciliation: Allows user to reconcile tills.
Till Reconciliation All: Allows user to reconcile all tills at once.
Touch Module: Grants user ability to use touch, this can be limited by other access settings as to what they can do within this module.
User accounts: Gives access to users.
- Sales Options
Change Price Category: Allows user to change what price type they are viewing.
Discounts: Allows user to provide discounts outside of existing promotions or volume pricing.
Edit Prices: This allows the user during the sale to alter the line item price for a product.
Modify Sales Records: Allows user to alter past sales records outside of refunds modules.
Non C.O.D Sales: Allows account or other non-cod sales to be managed by this user.
Related Products check: This determines if a user gets a prompt for related products when committing a sale, if disabled the user will not see this prompt.
Related Products check: Prompts user when related products are present on committing a sale.
Select Sale Customers: Allows user to change what customer is linked to the sale they are performing, if turned off they are only able to sell to the default customer.
Show cost: Where available displays the cost price of products.
View Sales Records: Allows user to view previous sales and sales histories.
View Profit / Loss: Allows user to see eGP% and related values, requires show cost be enabled.
Reverse Payments: Grants user permission to reverse payments on sales.
- Editing Options
Add customer account: User is able to add account set up to customer cards.
Add customer credit: Allows user to manually grant credit to a customer card.
Alter cost incoming: Allows user to change the cost of a product in an incoming good record.
CRM Supervisor: Grants admin controls over CRM.
Edit cards: Allows general editing permission for customer cards.
Edit Products: Allows general editing permission for Product cards.
Edit Labour: Allows user to edit labour non-products
Merge Cards: Allows for merging of customer cards.
Modify dispatched operations: Allows post dispatch editing of orders, sales, and other records.
- Price Revisions.
Edit: Allows user to start and edit a price revision.
Approve: Allows user to approve and mark a price revision as finished
Make Live: Allows a user to make a price revisions prices live, updating all live prices of that price type.
Index to reports access is a legacy function that we no longer recommend be used. If you need this functionality we suggest speaking to support to assist moving you over to using the report server.
Report Access is a list of reports contained in Misc parts of the system that are not in the Report Server, ticking these will allow the user to run those reports.
Report Server Access is where you can set what reports this user will see in the report server, so an example may be giving your bookkeeper just the reports they need, without all of the extra reports that an inventory manager may need.
Log Out tab contains the settings per user for auto sign out, this allows you to automatically lock the system and sign them out after a set duration post sale or when idle.