Christmas Survival guide
This guide goes over a few areas heavily used for the Christmas period, these can be used for general trading or other holiday periods as well, however the below examples will be aimed at the Christmas period. Each section also has an additional links to other parts of the manual which will give you some additional depth on the topic beyond its use for the Christmas period.
Christmas orders can be easily managed by using the existing orders functionality with line validation. Line validation allows you to have a KG product, sold and priced as KG, that you calculate and handle in another unit. Below we go over some examples of how to use this, how to produce lists on this, and suggestions on approaching Christmas order management. If you need to discuss a more specific work flow for your site reach out to PBSA support at support@pbsapos.com.au
We also suggest reviewing our orders documentation if you aren't already using them first.
There are two steps to setting up line validation, first is setting up the rules you want to use in the global settings and then on the product card.
In our example we have two products we are settings up, a turkey and a ham.
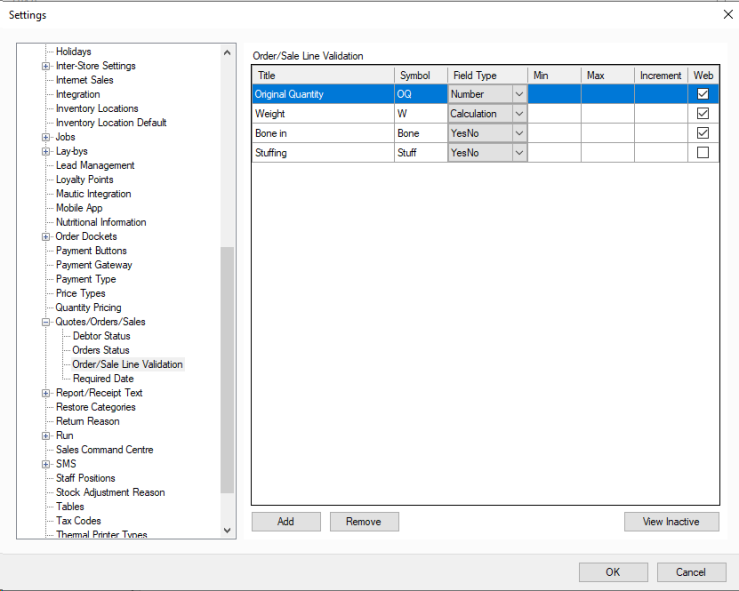
Going into File > Settings > Global Settings > Quotes/Orders/Sales > Order/Sale Line Validation.
In here we will want to set up our line validation rules as shown below. For our products we will need a calculation rule for the weight, a yes/no rule for stuffing, and a yes/no rule for bone in. Symbol is what will display on the line item, so its good to make sure this is recognisable.
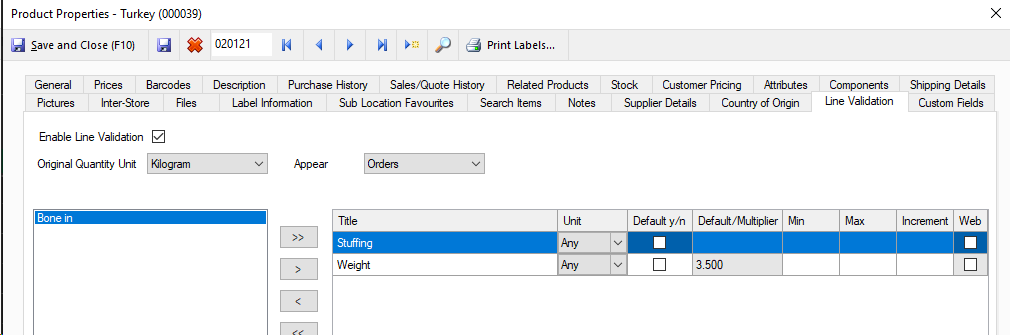
Now that these are set up we want to go to our products, and select the line validation row. In here we will want to add the rules for our turkey as shown below. Unit we will leave as any because we will only ever really be selling it in KG with these rules, however if you wanted different line validation options for a carton vs a kg unit you could use this to determine what shows up. The default value is the default weight for the product, so for our turkey that is 3.5kg's while the ham is 2kg.
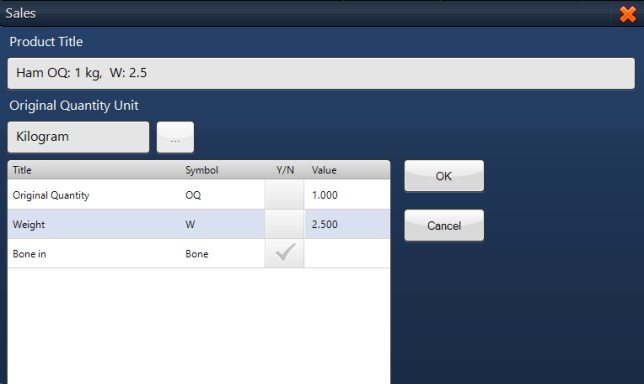
Now the turkey is set up we want to add our rules for the ham.
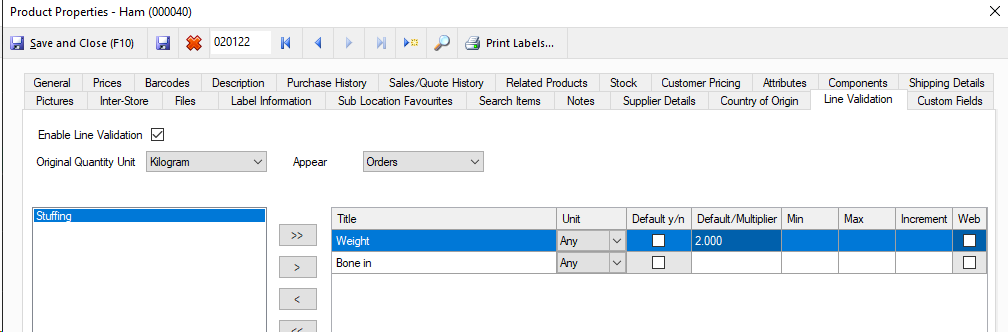
An important note is that on both of these you will notice in the top left we have set it to Orders, rather then sales or All. This is because in our situation we just want to weigh and sell a turkey when someone buys one directly over the counter, but I want to use my line validation for orders in advance so I can plan my Christmas run better. This reduces steps for the staff when handling direct sales without cutting into this ordering functionality.
Now we have our products set up we can take an order with the line validation.
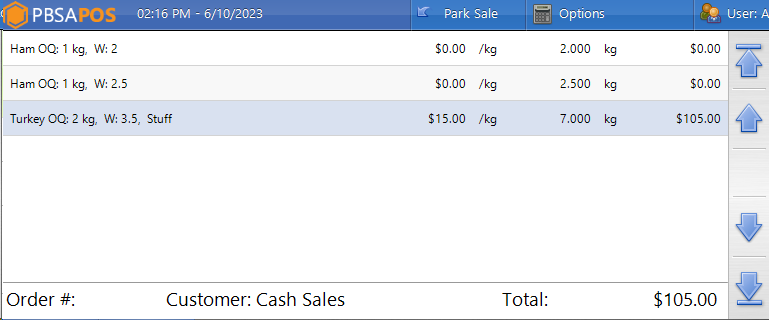
When adding products if you need to change the weight you can just change the value, so in our example below we have one 2kg ham, one 2.5kg ham, and two turkey's with stuffing in.
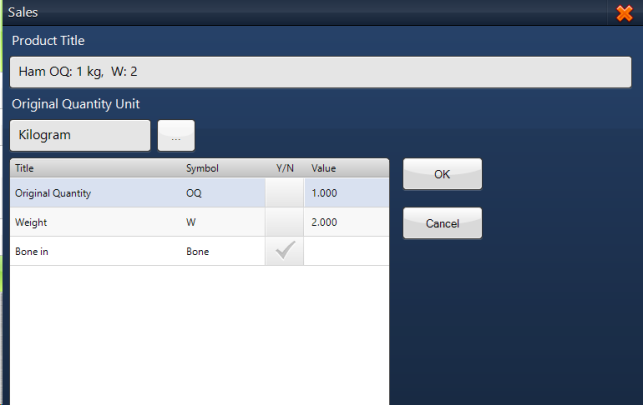
First ham we just set the Original Quantity to one, as they only want one Ham of this weight.
Next we add our other ham, altering that weight to be the 2.5 kg weight they want for this one.
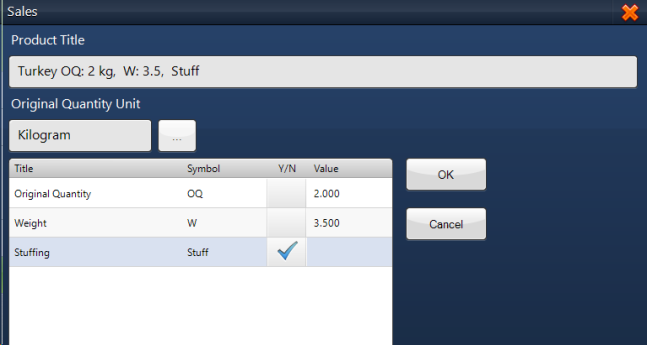
Now we just add the two turkeys, with these we just change the Original Quantity to two which allows us to record that they want two units at the weight listed.
Once this is done the sales order will look like below, which you will see contains that information we filled in above in each line item to make it easy to pack.
Now at this stage we simply manage it like any other order, committing it and taking any payment needed, before continuing onto the next order.
With all of your orders in you will want to run line validation specific reports to see how many of each product you need.
There are two useful reports, one gives you your overall totals per product while the other gives you a more specific break down of how many of each weight you need.
The first report is Order Line Validation which gives you your total quantities needed. This list gives you how many original quantities, which for us is Each units, and how many actual quantities in kg's you need. This gives you an idea of what you will need to fulfil the orders present.
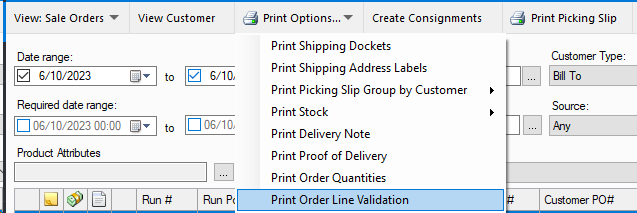
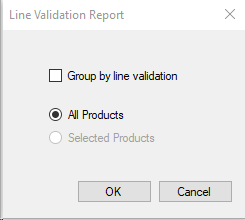
To print this go into Sales Command Centre and select Print Options, then Order Line Validation as shown below.
Once selected you will get the below options, group by line validation can help keep the list a bit easier to read if you have a lot of products to go over, and if you have used a product filter on the sales command centre you can use selected products to only see those. This would be mostly used where you just wanted to see your ham or turkey requirements for the period.
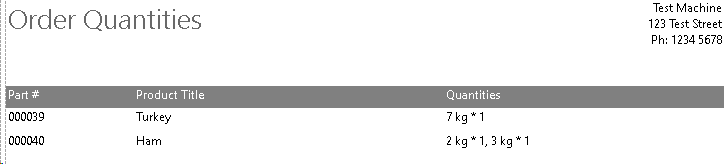
The second report is Order Quantities, you can find this in the same print menu as our previous report one line up. This report doesn't have any selections to make, and will simply be based off any orders showing in sales command centre.
As shown below for our example it will give you the part number, product title, and under quantities it will tell you how much has been ordered. A key note is that it counts by line item so in the case of our turkey where we put in 2 turkeys of 3.5kg each it has given us 1 * 7kg instead. This is meant to give a generalised list to help prepare total volumes needed to make ordering easier. This report isn't linked to line validation, and is just used for total weights needed for products.
Campaigns allow you to drive marketing for Christmas, or any other period, directly to your customers from PBSA. This way you can leverage the existing customer information, like purchase history or loyalty memberships, to decide who to market to.
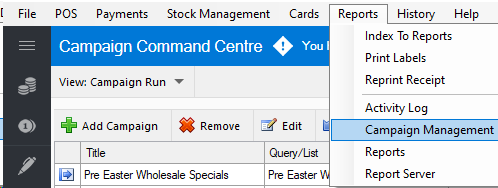
You can find the Campaign Management section under the Reports menu as shown.
In here you will be able to Add, Remove, Edit, Test send and Run Campaigns from the buttons along the top.
When you add a campaign there are a couple of things to set up, so we will walk through setting up our 2023 Christmas marketing email below together.
First select Add Campaign and add the title and From Email.
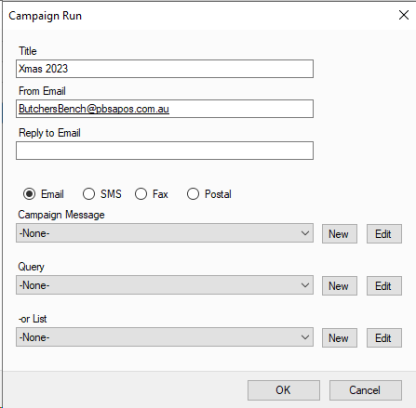
Once this is done we want to add our Campaign Message and a Query or List.
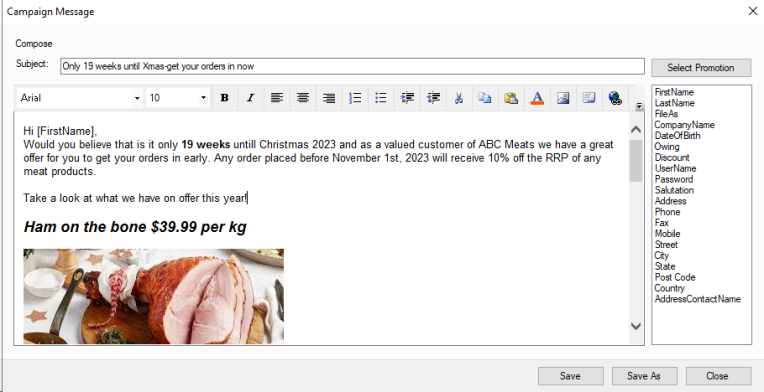
For the Campaign message this is the email we will send, you can select an existing one to use or edit, or you can select new to make a new message.
When making a new one or editing you will see a screen like below, as well as a snippet of our campaign message which we have used some of the data from the side bar and inserted some images to give it a nice polished feel. The information like [FirstName] will draw on the customer card to fill that information in, so that it reads less generic and is a bit more tailored.
When you have saved your campaign message the next thing will be to set up who we want to target this to. You can do this with a Query or a List. With a list you are just manually adding the customers you want to get the email, while a Query will use the search terms you decide to set up to produce its own list to email.
We generally recommend Queries so if new customers register between the creation of a campaign and its sending, or if conditions change for some customers, it still targets exactly who you want.
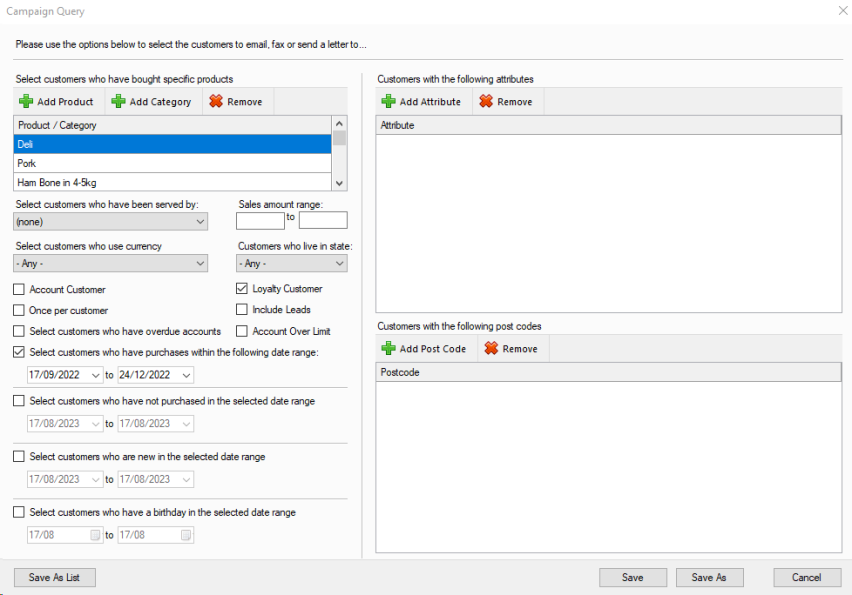
When you select a Query to edit, or new, you will get the below screen. While there are a lot of options which can seem difficult to work through initially, the key ones we suggest for a Christmas list are:
Loyalty Customers.
Customers with purchases in a defined period.
Customers who have purchased from specific categories or products.
You could also use this to run a campaign targeting customers who live out of state for your online campaign, then another for locals as one example.
Below you can see what we have set up as our example, but we recommend mixing and matching options to see what suits your customer based best.
When you are happy with your query you now have your Christmas Campaign ready to go.
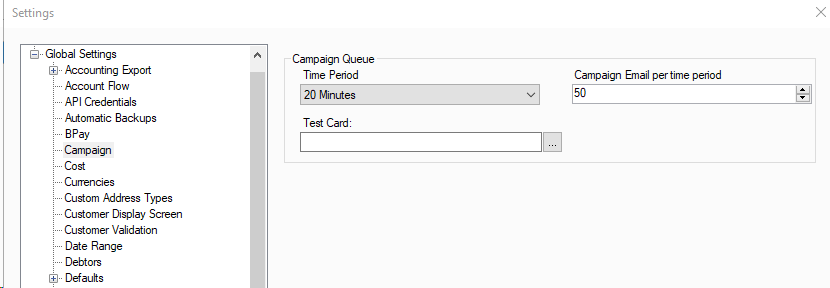
Now when ready we recommend using the test campaign, you can set up the test campaign card in File > Settings > Global settings > Campaign as shown below. You can also set up how many emails to send and how often in here.
Once your test campaign email has sent and you are happy simply press run campaign to kick it off and start sending.
This section covers setting up a basic and generic loyalty program, how to sign up a customer, and how they will redeem their points in this program.
Setting up the loyalty program has two steps, first we need to set up the settings then apply a value against our products to be earned.
First to set up the settings we want to go into File > Settings > Global Settings > Loyalty points.
In here we will want to turn loyalty points on by ticking this box, set our conversation rate (This is used for accounting purposes), and how often they expire.
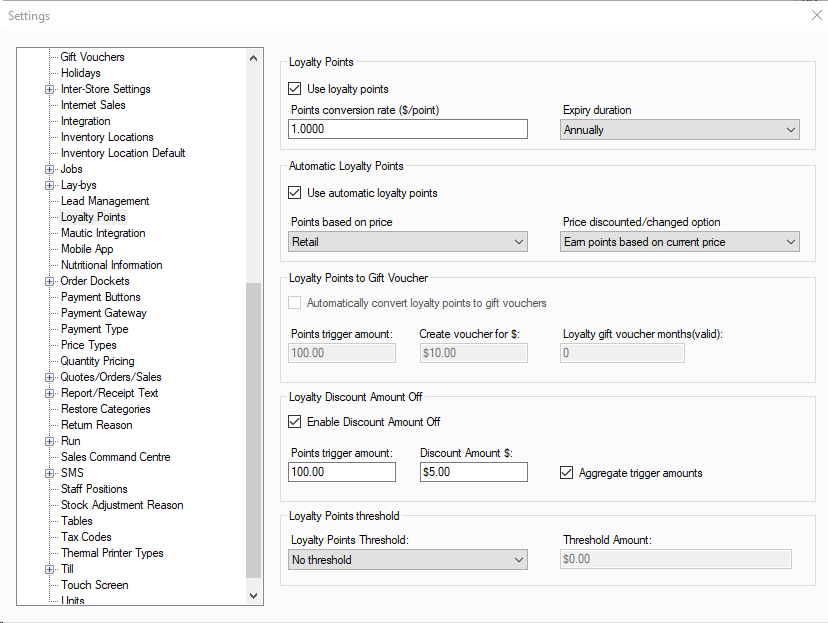
Now we will want to go down to the Loyalty Discount Amount Off area. This is the currently recommended model to use, as it is simple both to understand and use for customers and staff.
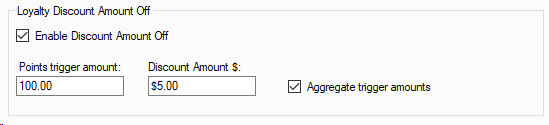
In our example above we have set it up so once you earn 100 points we give $5 off, and by ticking the aggregate trigger amounts we are going to allow people to bank more points to get a larger discount. This means someone hitting 300 points will be able to claim a $15 discount.
Below this section is the Loyalty Points threshold, in here you are able to enable it so customers have to pass a certain amount before you allow them to start earning points.
Now we have this set up we will want to add the earning amounts to our products. We will want to go the Stock Management menu and select Product Bulk Editor from it. Now in here we will just select populate, however you can use the filters on the top left to select smaller groups.
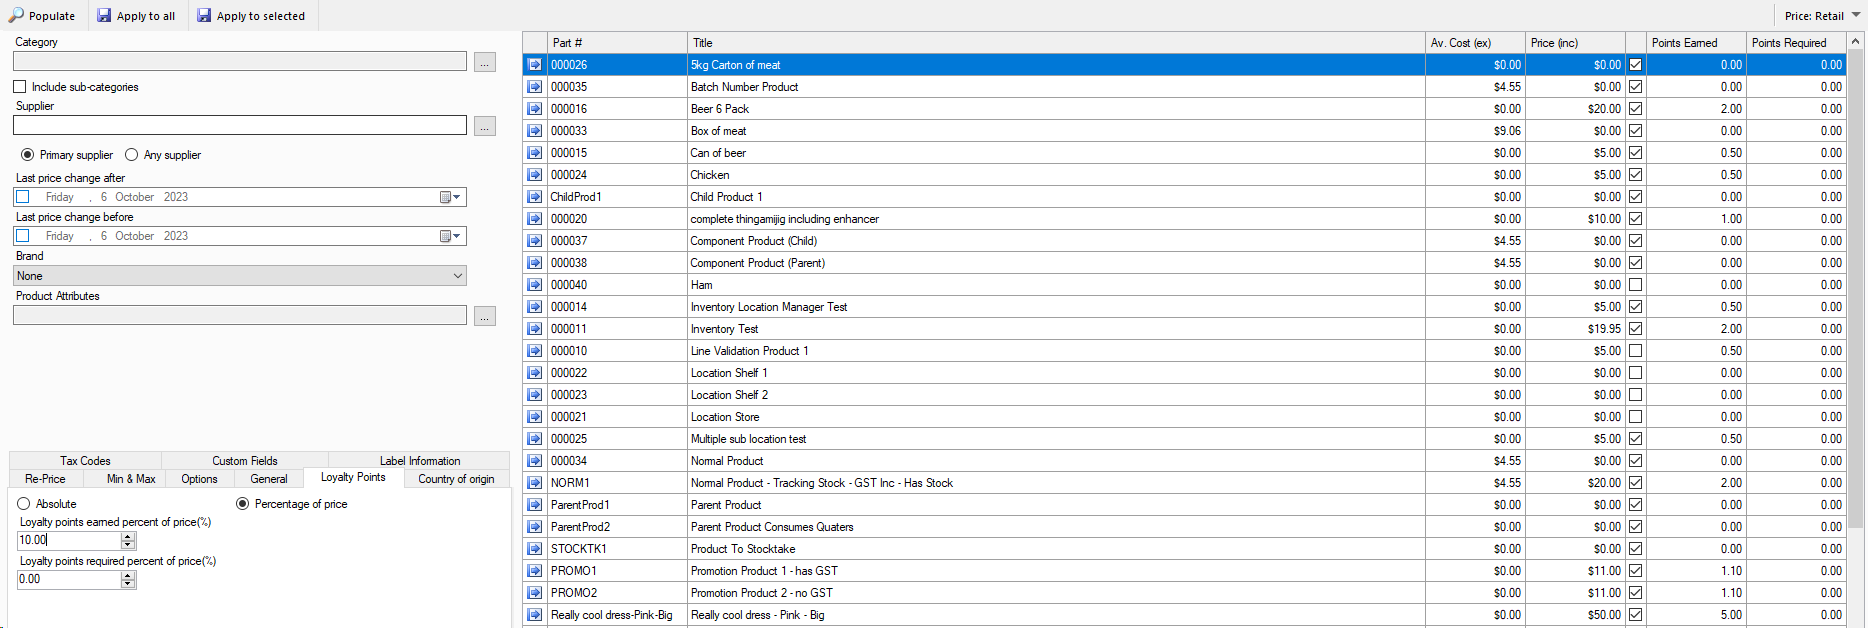
Once we have populated the list as shown above we want to go to loyalty points and set our values. In this case I am setting it to 10% of price, so for every ten dollars spent a point is earned. Simply hit apply to all and it is ready for customers to start earning points once it is turned on for their customer cards.
Existing customers can easily have use loyalty enabled on their card, and a member card added if you are using them, by pressing edit when selecting their customer at any given time.
Otherwise when creating a customer in both touch and non-touch you can easily enable this and add member cards. Customers will not gain loyalty points for any past sales and sales against the default customer cannot be converted to an existing customer to grant them loyalty points.
Once a customer has earned enough points redeeming them with this model is as simple as a button press. When you press Commit on a sale where the selected customer has enough points you will get the below prompt.
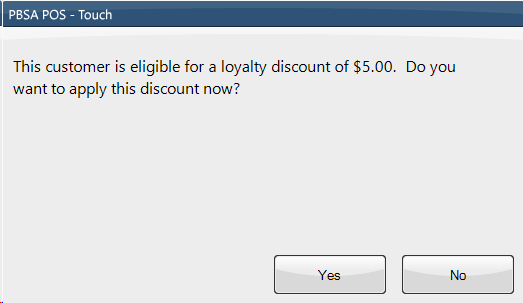
Pressing no leaves the points in their bank and continues as normal, however pressing yes will give them a discount and consume those points. If you are using aggregate discounts this amount will be the highest amount they can claim as a discount.