Product Cards in depth
The below section steps through most of the details of Product Cards as an in depth break down.
The products module enables products to be created, managed and searched for. Products are sorted in categories and sub categories. Clicking on a category will display the relevant products on the right data grid.
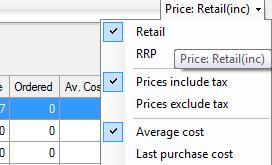
The data grid will display the products Part#, Title, Available quantity, Ordered quantity, Price and Cost. The cost column can be either average cost or last purchase cost. This setting default is set in the settings form but can be changed in the session via the "Price" option list.
There are some features that are beyond the basics and not suitable for this introductory walk through, you can find them at the below links or go to the Products section of the how to menu.
Products can be added which are components used in the current product. For example, a gift hamper could have component products of cheese, biscuits, wine, and a basket. Press the “Add a Component” button to add a component product and then enter the quantity to use. Only products that track stock levels can be added as a component product. This is so that when you are viewing how many of the product is in stock, it will display how many you can build of that product using its components. For example, if you had 20 cheese, 20 biscuits, 20 baskets but only 10 wine the number of gift hampers would display as 10 as you can only build 10 hampers from those components.
When this current product is added to a sales order or sale the particular components and their quantities will be removed from stock.
The price viewed can be the break down of the components or via the break down of the package price. The price type can be changed also.
If the product chosen as a component has the track serial number option true then when the product is added to a sale, order or quote the product is split into its components.
A print check option is provided that determines if the components of the product will print on the sale, order or quote under the selected product.
At times stock that has been allocated to particular sales orders may need to be reallocated to other sales orders. Then can be achieved via the "Product Allocation" module. Under the menu ‘Stock Management’ is the new form ‘Product Allocation’. Within this form stock can be allocated to and from various sales orders.
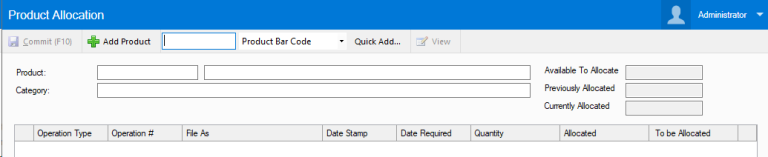
In the sales order screen by double clicking on the relevant product title, a ‘Set Product Allocation’ form opens. Within this form stock allocated can be reduced, thus making it available for other sales orders.

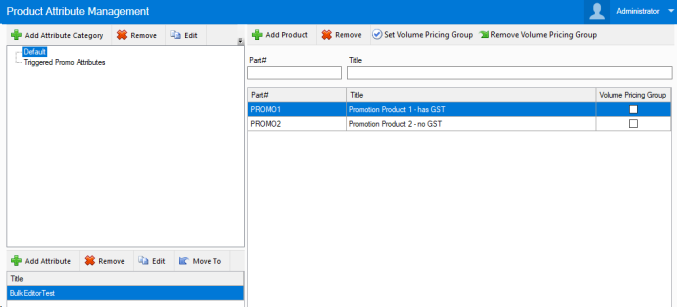
You can manage attributes directly on a product card, or via the bulk manager which is called Product Attribute Management and can be found under the stock management menu.
Product Attributes can be grouped into categories. To create a new Product Attribute Category simply press the Add Attribute Category. ‘Edit’, ‘Remove’ and ‘Move To’ functionality is also provided. Select the relevant Product Attribute Category but clicking on it, then to add a Product Attribute press the ‘Add Attribute’ button.
To add a Product to the Attribute, select the attribute and then press the ‘Add Product’ button, and then select the relevant products.
Products can be searched for by pressing the search button. The search button also has a drop down with three options: The following fields can be searched on, Part#, Title, Barcode (only in Non Predictive search), Supplier’s code, Supplier, Brand, Last price change and Product Type. Product Type has three options, “All Products”, “Regional Products” and “Local Store Products”. Regional products are those created by regional office and local store products are those created locally.
The re price function enables groups of products to have their price adjusted. Groups of products can be via, Category, Supplier (primary or any), last price changed after a date, last price change before, price rule, brand and Product Attributes.
This can be found as part of the product bulk editor, which is under the stock management menu.
Once the group of products are chosen press the “Populate” button. The relevant products will then display in the right data grid. There are different methods to applying a price change. First select the Price Rule followed by selecting the Rounding Rule then enter the relevant value. You will notice the New Price column will update. Press the "Apply" button to save the changes.
If the "Fixed" rule is chosen then three further options are available. Percentage, Dollar Change and Absolute Price. Changes can be made manually in the New Price column. When the prices are correct press the “Apply” button
By selecting the “Loyalty Points” tab you can adjust the loyalty points earned and required. Choose the group of products the same way as adjusting the price then select either; “Absolute” amount or “Percentage of price”.
The “Absolute” amount option will apply the amount entered in either the Loyalty points earned or required text box. The “Percentage of price” option will multiple the percentage entered in either the Loyalty points earned or required text box against the price. When the values are correct, press the “Apply” button.
Selecting the Product Details tab enables the product property "Show product online" to be turned on or off.
From the tool bar new products can be added, deleted, active and inactive products viewed, product properties viewed, products can be moved to, copy to, duplicated and products price types can be changed.
A new product can be added by pressing the “New” button. The new button has two options; “Normal Add” or “Wizard Add”. The “Wizard Add” provides tools to help ensure duplicate products are not created by searching for matching titles and barcodes before creating the initial card.
The first step in the wizard is to enter the title of the new product. A list of similar products will be filtered for your reference. If product is found that is the same as the new one you are trying to add, press “Cancel”. If there is not a similar product press the “Next” button.
The next step involves entering the new barcode and pressing the “Search” button. If a match is found the add process will be cancelled. If you do not have a barcode press the “Skip’ button.
If the “Skip” button has been pressed or no barcode matches where found the product properties form will open with the product titled entered and any barcodes entered.
If the “Normal Add” option was selected then the product properties form will open blank.
The product properties have a number of tabs with various fields and information.
General
Dynamic Re-ordering
This feature calculates the re-order amount in purchases orders dynamically. To select this option choose "Re-order dynamic amount". Enter the maximum stock level in the new field "Max stock level". If the current stock is 5 for example and the Max stock level is 20, when the product is added to a purchase order it will calculate 15 as the amount to order. New fields in the product importer have been added; "Use dynamic stock level re-ordering" (Yes/No) and "Max Stock Level"

Potential Stock Level
You may have no stock showing as available for a product, but as you know PBSA POS will allow you to still sell or pre-build these as long as you have enough stock of each of its components. The Potential Stock Level shows you how many of these products you could potentially sell based on the stock levels of the components.
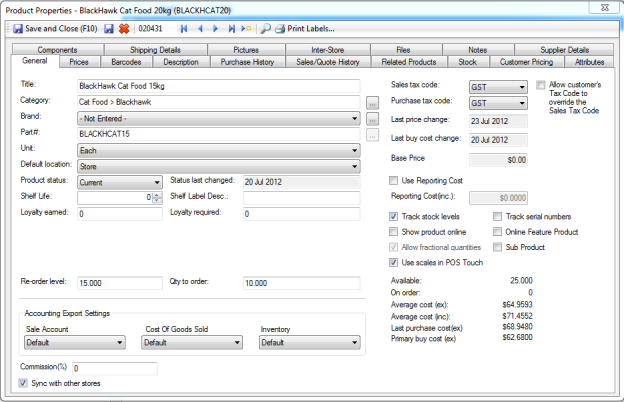
The general tab has the following items:
When updating the product card to save any details added to the product properties press F10 on your keyboard or click the “Save and Close” button.
|
Title |
Enter a descriptive title, this will be displayed on invoices and when adding products to sales/quotes/orders. |
|
Category |
The category/sub-category in which the product is saved in is displayed. To change the category press the select button “...” to open the “Select Product Category” form. |
|
Brand |
To select a brand choose a relevant one from the values in the drop down list. Pressing the select button “...” will open the “Brands” form in which brands can be added, edited and removed. |
|
Part # |
Enter a unique part number or press the button “...” which will generate a unique part number for you. This must be unique across all products. |
|
Unit |
Select a unit from the drop down list. This list is populated from values entered in the unit section of settings. |
|
Default location |
Select the default location of the product. The default location will be used to bring stock in and out of inventory as default. |
|
Product status |
Select one of three statuses; Current, Unavailable or EOL. |
|
Status last changed |
A date is set when the product status changes. |
|
Shelf Life |
The shelf life of the product in number of days, this is used for best before dates on labelling. |
|
Shelf Label Description |
This description is used in the Print labels module. |
|
Loyalty earned |
Enter the amount of loyalty points earned when the product is paid for. |
|
Loyalty required |
Enter the amount of loyalty points required to use when paying with loyalty points. |
|
Re-order level |
Set the re-order level of the product for fixed or dynamic reordering. |
|
Qty to order |
Set the quantity to be ordered when ordering this product. |
|
Accounting Export Settings |
You can select a different sale, cost of goods sold or inventory chart of account for the product. Select “Default” to use the default chart of account set in settings. |
|
Commission (%) |
A percentage amount can be entered that is used on the sales by staff report. |
|
Sync with other stores |
This option is used when an inter-store license has been purchased. Tick this option if you want to sync this product with other stores. |
|
Sales tax code |
Choose the relevant tax code to apply when the product is sold. |
|
Purchase tax code |
Choose the relevant tax code to apply when the product is purchased from a supplier. |
|
Last price change |
This displays the date that any sell price was last changed. |
|
Last buy cost change |
This displays the date that any buy cost was last changed. |
|
Base Price |
This displays the base price (This will be named "RRP", or the name of your base price) |
|
Use Reporting Cost |
Choose this option if you want relevant reports to use the "Reporting Cost" instead of the average cost. This is useful if component products do not have any value. |
|
Reporting Cost |
Enter the amount to be used as the reporting cost. |
|
Track stock levels |
Choose this option if you wish to track stock levels for the product. This cannot be turned off if stock is against the product. |
|
Track serial numbers |
Choose this option if the product has unique serial numbers and you want to track these |
|
Show product online |
Choose this option if you have an online store module. This will show the product online or not show the product online. |
|
Online Feature Product |
Choose this option if you have an online store module. This option will include or exclude the product for the feature section of the online store. |
|
Allow fractional quantities |
Tick this option if you want the product to allow fractional quantities. |
|
Sub Product |
Choose this option if you have the touch module. Sub products are indented in the POS screen and associate with their parent product. |
|
Use scales in POS Touch |
This option will enable the product to use scales, allowing you to get a weight from them when in the touch module. |
|
Display information |
The available stock level and the stock ordered are displayed along with the products average cost ex and inc GST and the Last purchase price and the primary buy cost ex GST. |
Prices
Prices can be set for each relevant price type. Select the rule that you wish to use then the rounding rule. The cost is show to assist with determining the price based on the eGP and eGP%. The cost can be either Average cost or Last purchase cost. Enter the relevant value in the Amount column. You can read more in depth about prices here.
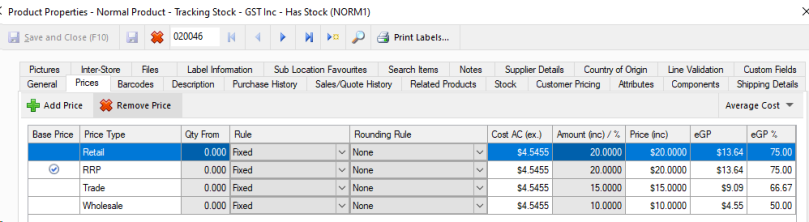
Qty pricing is supported and by default the value is set to zero. For more information on how to use this read this page on Volume Pricing.
Barcode
Multiple barcodes can be added for the one product. To add a barcode press the “Add barcode” button.
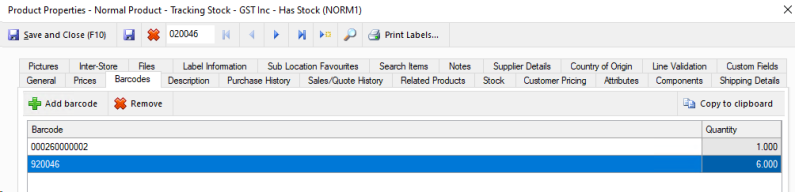
A barcode form will open in which you can enter a barcode in or press the generate button. The generate button will enter a unique sequential barcode number into the form. Pressing “Ok” will add the barcode to the data grid. To remove a barcode select the relevant row and then press the “Remove” button.
If you want to print a barcode select the relevant row, press the “copy to clipboard” button and paste the barcode into a barcode printing program.
A Quantity field is available. When the barcode is scanned in a sale for example the quantity displayed will default to what has been entered.
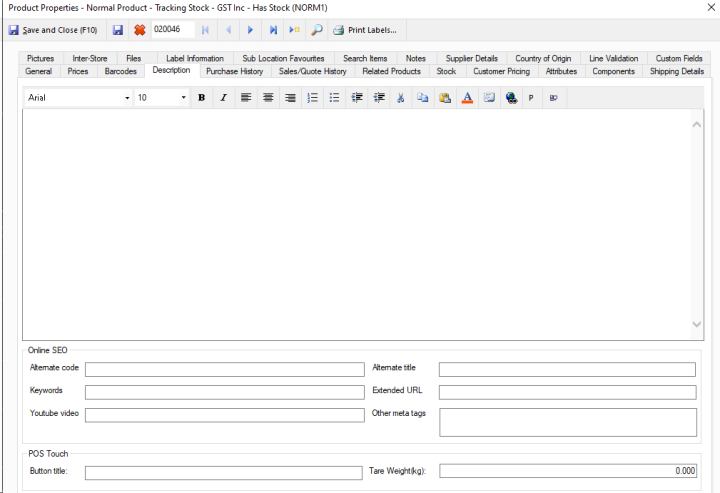
Description
The Description tab is used to write an extended description for products that are used for an online shopping card module.
Under POS Touch you are able to set the Tare weight used for Sales and Orders in touch.
Purchase Order History
The sales and quote history of the product can be shown. The date, type (Sale, Sale Order, Quote) Ref # , customer name, quantity and price are shown.

The history can be searched via date range and specific customer or leave blank for all. To run the search, press the “Show History” button.
The search can be narrowed by changing the Type from All to Sales, Sales Orders or Quotes
Related Products
Products that are related to the product can be added. For example a mobile phone may have a related product, charger. To add a related product, press the “Add product” button. To remove a related product, select the relevant row and press the “Remove” button.
Stock
The stock location tab lists the unallocated stock levels for each location. Clicking on a location will return a list of serial numbers for products tracking serial numbers.
This section will also display negative stock details as well as batches details if either of these features are in use.
Customer Pricing
Customers may wish to set a contract price for a product. You can add customers to this product via the “Customer Pricing” tab. To add a customer, press the “Add customer” button. To remove a customer, select the relevant row and then press the “Remove” button.
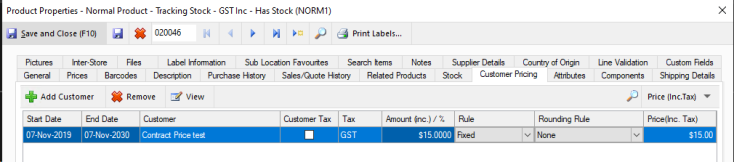
After the customer is added to the data grid you can choose the start date and end date of the contract pricing, then enter the price in the price column. When the customer adds this particular product to a quote, sales order or invoice the contract price will appear. If the product is added outside the contract time period, a message will appear asking the user if they would like to use the contract price.
Attributes
Attributes are a custom identifier that can be added to and removed from products. Attributes can currently be used for reports, searches, and triggered promotions. It can also be used with the reprice tool and will be used in future for non-triggered promotions. Examples of attributes are, in the case of promotions, 3 for $5 or 5 for $10. In the case of using attributes for reports and searches, you could tag all 2014 Vintage wines with one attribute and then you could view a report for 'Sales by Attribute' and see a report for these.
Shipping Details
Shipping details are used for the online store module. Enter in the shipping width, height, depth and weight of the product. Also select if a fixed shipping price is used.
Pictures
Pictures are used for the online store module and the touch screen buttons. Add, remove and change the order of the pictures relevant to your online store.
Files
Files can be added to the product for reference. A good example is a specification document. You can add, remove, edit and open the file. You must first set up your file location in settings before you are able to use this function.
Label information
Label information contains all of the details needed for printing your labels when packing in label print mode.
Note that the tare weight set here is only for label print mode, and you need to set the tare weight on the description tab for sales or orders.
You are also able to use the Product url here to set a url that can be printed on product labels for customers to scan.
Notes
General notes can be recorded on the product. These do not display anywhere else in the software and are not visible to customers.
Supplier Details
Primary, secondary and third supplier details can be added. Simply add a supplier, enter the supplier’s code and the relevant buy cost for the product.
Country of Origin
This area allows you to set your country of origin for label printing. You can also add a custom message as part of this, such as "all meat came from local greater Ballarat farms" or other information that you think would be useful.
Line validation
Ticking the enable tick box here allows you to add line validation options to the product. By default enabling it turns on the Original Quality line validation and cannot be turned off. You can find out more about this feature here.
Custom fields
Custom fields can be used for a large range of functions, the most common of which is to add additional details to labels or A4 documents. You can name
these in settings to make them easier to reference or remember what you are using them for as well.