Sales Command Centre
The Sales Command Centre can be opened by either selecting the “Sales Command Centre” option on the left menu or by selecting the “POS” menu and then selecting the “Sales Command Centre” option.
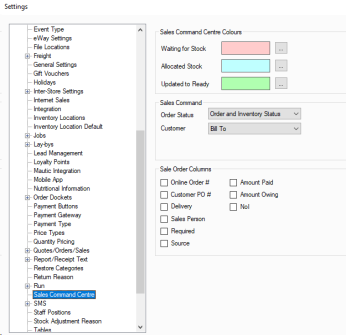
The columns available can be changes via settings for your Sales Orders.
The columns you can enable and disable are listed below:
Online Order #: This will be the customers online reference if ordering through an integrated website.
Customer PO #: The customers purchase order reference, if provided.
Delivery: Delivery method selected.
Sales Person: Staff member who processed the sales order or was added to the sales order.
Required: Required date for the sales order.
Source: Origin of order, such as Store or Website.
Amount Paid: Balance currently paid for.
Amount Owning: Balance remaining against this sales order.
Nol: Number of line items on the Sales Order. This is total lines, not a total quantity of products.
You can find these settings in File > Settings > Global Settings > Sales Command Centre.
We also have some default columns you cannot disable, if you are ever uncertain what a column is for you can hover your cursor over the column name or icon to get further information.
The command centre lists each sales order and the columns available. Check the above section about columns to see what each one is used for.
It is possible to print the delivery dockets of multiple sales orders at one time. Simply select multiple orders from the list and click the Print Delivery Docket button.
The total can be changed from “Ex Tax” to “Inc Tax” by changing the drop down option on the top tool bar.
The sales command centre can be filtered by selecting the date range, customer type, bill To or Ship To, a specific customer, sales order number range, status (Any, Waiting for Stock or Ready), online order number range, a specific product or source (Any, Shop or website). To activate the filter press the “Search’ button.
You are able to combine any of these filters together to refine the results further.
When the sales order status changes or stock has been part allocated colour coding is used to visually update the user. When a row in the data grid is white this means that the order is ready and all stock has been allocated to the sales order. There are three other events that will update the sales command centre row colour:
Waiting for stock: This event colour is used when products in a sales order do not have stock allocated to it.
Allocated Stock: This event colour is used when some products in a sales order have had new stock allocated to it which has come in.
Updated to Ready: This event colour is used when a sales order that was waiting for stock now has all stock allocated two it and is ready to be dispatched.
Along the top bar have a range of options for printing and managing orders which are both shown and explained below.

View: Selecting this option allows you to toggle to Sales or Quotes and back to Sales Orders.
View Customer: This will open the customer card for the selected order.
Print options contains a number of choices outlined here.
Print Shipping Dockets: This prints the shipping dockets for the selected orders.
Print Shipping Address Labels: This will print the shipping address labels for the selected orders as long as a label printer is set up on the computer in use.
Print Picking Slip Group By Customer: This is a picking slip that is done per customer rather then by product or orders, and you can select to have each customer on a separate page or all together to reduce pages printed.
Print Stock: This prints all stock required for present orders, if you have filtered your orders by a product you can also select to only print these.
Print Delivery Note: Produces a delivery note for the selected order.
Print Proof of Delivery: Products a proof of delivery document for the selected order.
Print Order Quantities: This produces a list of all products and the total amounts required to fulfil the selected orders. This does not group by customer or any other values.
Print Order Line Validation: This products a report similar to Order Quantities but includes the line validation values in it.
The sales command centre can also manage invoices that have not been dispatched.
In here you can filter to locate sales, create new sales from the new button in the bottom right, or open a sale by pressing the blue arrow to its left, double clicking on the line, or pressing View in the bottom right after highlighting it.
You are also able to highlight multiple sales and select dispatch in the bottom left to dispatch them in a group.
Create Consignments: This will produce consignments for the selected orders.
Print Picking slip: This will produce a picking slip for your selected orders, this will use the customer picking slip if they have a custom one, but otherwise will use your global default for printing picking slips.
Email Order: This queues an email based on your Sales Order template for emails with a PDF of the order attached.
Export: Export allows you to export shipping details or a prepared file for Teletrac

Along the bottom there are several buttons, as shown above, below is an explanation of what each does:
Dispatch: This will dispatch the goods, and will prompt you if it is unable to such as if its still waiting on payment and has payment required before shipping enabled.
Reset: This resets the alert colour back to default for selected orders.
Print Order label: Pressing this button on a computer with a label printer set up will print the order label for the selected order.
Create Invoices: This will create an invoice, or sale, for the highlighted orders. It will also prompt you if you want to dispatch these if they are not already dispatched.
Allocate: This will allocate all stock available to the selected orders.
Delete: If available this will delete the order and prompt for any payment reversals required.
Notes: Opening this will allow you to see and edit the notes for the selected order.
New: Starts a new Sales Order.
View: Opens the selected Sales Order for management or viewing.
Quotes can be managed within the sales command centre. Simply select the “Quote” option from the View drop down menu. When the “Quotes” view is chosen the following fields will be displayed in the data grid; Quote Number, Customer, Sales person, Created date, Expire date and Amount total.
The Amount total can be changed from “Ex Tax” to “Inc Tax” by changing the drop down option on the top tool bar.

Quotes can be filtered by date range, customer, quote number range, Status and a individual product. Status has three options, Any, Open and Converted. Converted are quotes that have been converted to sales orders. To activate the filter press the “Search’ button. A quote can be converted to a sales order by selecting the relevant row and then by pressing the “Convert to Sale...” button. Buttons are also provided to create, view or delete quotes.
A quote can be viewed by pressing the blue button on the left cell of the relevant quote. When viewing the quote you can return to the command centre by pressing the green “Back” button on the top tool bar.