Basics of PBSA POS
This guide is intended for the core four essential parts of PBSA POS needed to start using the system initially. We do recommend continuing off from here to read the general training guides you can find here next, or the industry specific training you can find here.
Below there are the four sections introduced in a light format, please note these are not fully comprehensive but intended as a spring board into the basics of the system.
When first setting up products you will need to build your Categories and your products.
To create a category first open up the products section of PBSA POS either from the left hand menu or from the Stock Management menu then selecting Products.
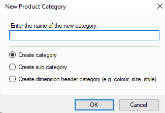
In here you will see the below top bar, click the blank while page next to the search options to create a category.

You will see the below options, select either category or sub-category as suitable, and enter a name.
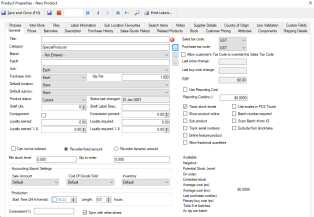
Now you have a category you can create a product. To do this select the white page in the same top bar that says New...
You will have the below screen, in here you want to input your products title, part number, and set the options in the bottom right to determine if it is tracking stock, uses scales, or any other settings.
Once this is done you will also want to go to the prices tab, once you select this you will see the below screen.
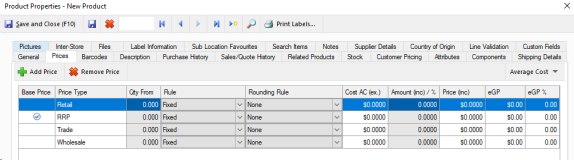
In here you can select the grey field under amount $% to set how much this product should cost.
Once this is done simply press the Save and Close button in the top left to save the product and create any others you need.
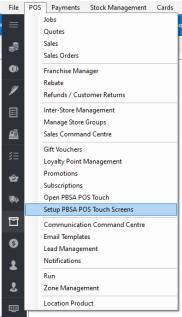
In order to set up your first touch screen you will first want to go to POS then select Setup PBSA POS touch screens as shown below.
Once in here you will want to select Add screen in the top left as shown.

Then you will see the below layout.
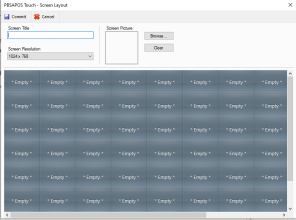
In here you will want to add a name into Screen Title, before selecting any of the buttons to start designing your layout. Below we go over what button options there are and what each does.

Product: This allows you to select a single product, and when pressed it will add this item to the sale.
Product Category: When pressed this will open an auto-populated screen with the products within this category.
Open Screen: This will create a button to open another touch screen you have made.
Gift Vouchers: This allows you to set up a gift voucher sell button to sell in touch.
Once you are done setting up the buttons you wish to use simply press Commit in the top left, if this is your first touch screen it will also by default become your default screen for using touch.
As a basics guide this will only cover doing a sale and till rec in touch mode. Please review the next stage of training for further or more detailed information if required.
When you open touch mode, either via the POS header menu or from the left hand side bar, you will be in sales mode by default. You will notice the default customer will display, which is usually cash sale, and you will have your touch layout available that you designed in the earlier step.
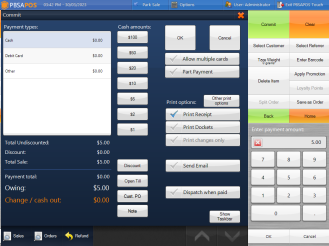
Doing a sale in touch is very simple, in that you only need to either scan the barcodes or press the buttons for the products you wish to add to the sale, before pressing the Commit button on the right hand side. In here you can select how much to take on each payment method, and if you want to print an invoice.
In order to reconcile your till select options along the top of touch, then choose till reconciliation from the top left corner of these options.
This will open the below screen, where you can input the counted values along with selecting what till you are counting. By default it will select the till this touch screen is using.
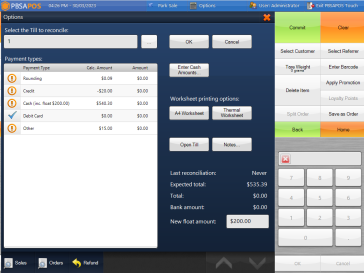
When you are done simply press OK to finalise this till rec.
Below are a list of important settings we recommend setting up before initial trading and where you can find them. To start with go to File and open the option Settings, this will contain all of the options outlined below.
Payment Type: Global Settings > Payment Type
In here you will want to tick the payment options you wish to use. If you are using integrated Eftpos you can ignore the card options, as your eftpos solution will input the values to the correct options automatically.
Company information: Global Settings > Report/Receipt Text > A4 Company information.
You will want to set up your company details, and logo if applicable in here, as this will be used for invoices.
Product Defaults: Global Settings > Defaults > Product Defaults.
In here we recommend checking each option and deciding if it is suitable for your initial set up, such as track stock levels or use scales. This is what new products will have by default.
Thermal Receipt options: Global Settings > Report/Receipt Text > Thermal Receipt Options.
In here you can set up your messages for your thermal invoices along with if its using an image on it such as a logo.
Touch Screen settings: Global Settings > Touch Screen
Menu button layout will be the key option here, as that decides what options you have on the right hand side when doing sales in touch and can greatly simplify the look and feel of it. Otherwise we do recommend reading through these settings to get it set up the way you want, as its normal to spend most of your time using PBSA POS in touch.